Drip irrigation in the orchard | Advantages and How to Install
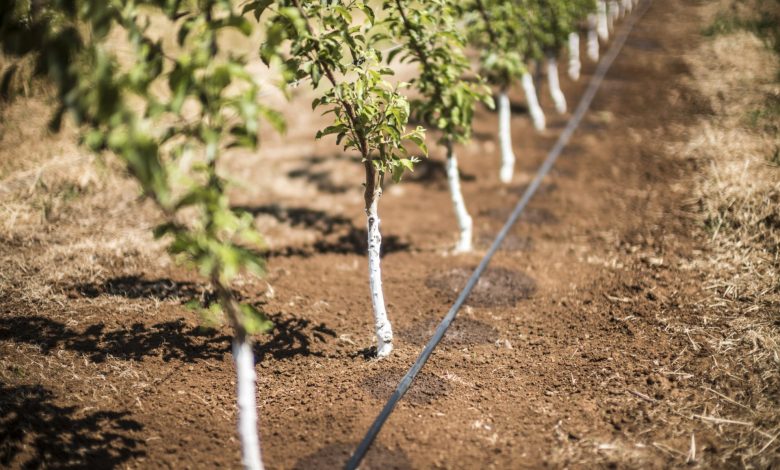
If you have started to plan the garden and you have already thought about where you are going to place it and what type of containers you are going to use, you can continue with the irrigation planning for the garden. There are many types of irrigation for the orchard, but one of the most recommended is drip irrigation, since there are many advantages of localized irrigation and, specifically, of drip irrigation.
If you don’t have much time, your garden is too big for irrigation with a watering can or hose, or you simply don’t feel like watering manually, you should install an automatic system, such as drip irrigation in the garden.
Advantages of the drip irrigation system
Due to its comfort and its environmental benefits in terms of water use, drip irrigation in the garden is the most common of the automatic irrigation systems used in ecological and sustainable gardens.
The main advantages of drip irrigation:
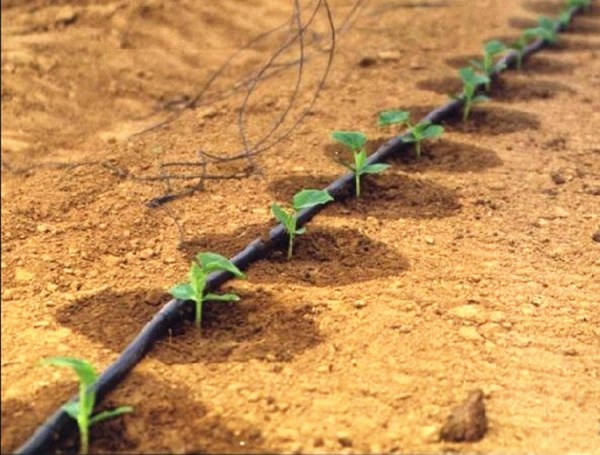
- It represents an important saving of water since it comes out drop by drop and goes directly to the ground, the water that evaporates being almost nothing.
- Provides a more constant supply of water (low quantity but watering closer together), which reduces the water stress that plants may suffer due to differences in the amount of water available in the root zone.
- It adapts to any type of crop, since the amount of water supplied is programmed according to the needs of each group of plants and, in addition, it is at ground level so it does not interfere with the space of the plants.
- It does not require earthworks to be carried out, as is the case with other systems such as buried pipes.
- It is more comfortable and less laborious than any manual system, which implies significant time savings.
- It minimizes the leaching of nutrients in the substrate that occurs when the irrigation water washes them down. With drip irrigation, both the water velocity and quantity are too low to promote nutrient loss.
What materials are needed to install drip irrigation?
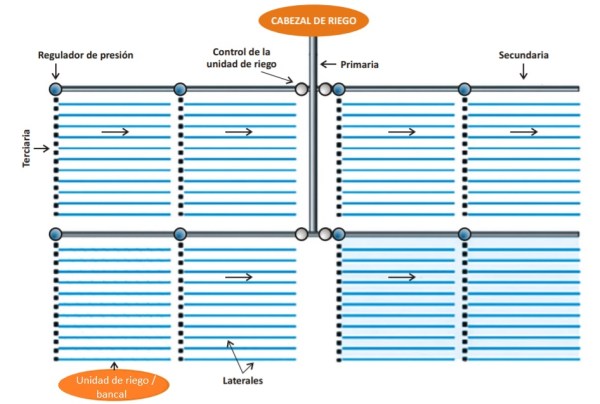
The components of a drip irrigation installation are:
- Irrigation head: faucet or water intake and programmer.
- Programmer. This device, which usually works with batteries, will be connected to the tap and will be in charge of opening and closing it as we have programmed it.
- Pressure regulator. It is not essential, but it is very useful to connect it to the outlet of the programmer to reduce the pressure at which the water comes out of the tap (the pressure needed by the drippers is less, so we protect the installation in this way).
- Distribution network: primary and secondary pipes for the sectorization of the orchard and lateral pipes or drippers (they can also be tubes without drippers in which we will make holes where we are interested to put drippers or diffuser nozzles in them).
- Auxiliary parts such as keys, elbows to join the tubes in curves or angles, etc.
Before going on to see how to install drip irrigation, something more about the irrigation programmer: if you want to do without it, you can do it, but it will no longer be an automatic irrigation system but you will have to open the key yourself. tap every time you want water to come out of the drippers.
How to mount a drip irrigation installation in the orchard
To learn how to connect the different elements of a drip irrigation installation, I recommend that you watch the following video (it explains it in detail):
Another option if you do not want to mount the drip irrigation installation yourself in the orchard is to buy the complete drip irrigation system. It will probably be more expensive, but it is also more convenient: your only job will be to connect it to the tap and place each dripper next to each plant.
This is an advantage, although it also has its drawbacks: buying each component separately will allow you to put the drippers where you are most interested, while if you buy the installation already assembled, the positions where the drippers are and, therefore, where you will have to put plants are fixed. If you want to leave more space between plants you will have to leave some of the drippers unused.
If you want more details on how to design the drip irrigation of the orchard, I recommend you take a look at the post Drip irrigation: What flow rate and distance between drippers should I use?
Drip irrigation for the urban garden
If you have the urban garden on a terrace or another small space such as the roof terrace or the balcony, it is also possible to install automatic irrigation.

Even if you do not have a water intake or tap next to the orchard, you can set up drip irrigation by replacing it with a small tank or drum to which an opening key and the irrigation programmer are connected.
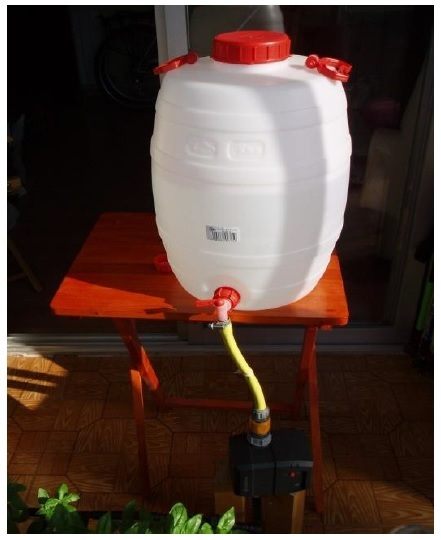
In this case, it is very important that you place the drum at a certain height (not on the ground) so that the water passes through the tubes by gravity. If you don’t do it this way, the water won’t have enough force to reach the drippers of the distribution network.
How many liters of water are needed for drip irrigation?
As we have already seen in other articles, the garden is not the same in the cold seasons as in the warm seasons. It is logical to think that in summer it will be necessary to water more.
To give you an idea, I leave you the average water consumption that a 1 square meter cultivation table and about 20 cm deep in an area with a Mediterranean climate may need:
- Spring: 10 liters/week
- Summer: 30 liters/week
- Autumn: 10 litres/week
- Winter: 1 litre/week
In the case of drip irrigation, in addition, it will be necessary to water more often than with manual or sprinkler irrigation (both in summer and in winter) since much less water is provided in each irrigation. For example, if we water with a shower in summer, it will be enough to do it every other day, while if we have a drip we will probably have to do it two or three times a day for 2 or 3 minutes.
If this post on how to install drip irrigation in the orchard has been helpful, don’t forget to rate it with the stars below and share our Agrohuerto page on Facebook and Twitter. Help the Agrohuerto Community grow so that we are more and more and can help each other in our task of cultivating!
If you want to know more about the different irrigation systems, I recommend you take a look at the post 6 Types of irrigation for your garden.
References
- Vallés, JM, 2007. The Urban Garden: organic farming manual on balconies and terraces. Serbal Editions. ISBN: 8476285078,
- Fernández Gómez, R., et al, 2010. Irrigation manual for farmers: module 4. Localized irrigation. Ministry of Agriculture and Fisheries of the Junta de Andalucía, Spain.
- Santos Pereira, L. et al., 2010. Irrigation and its technologies. CEER – Center for Biosystems Engineering, Higher Institute of Agronomy, Technical University of Lisbon, Portugal. 1st Edition in Spanish published by CREA-UCLM (Regional Center for Water Studies, University of Castilla-La Mancha, Spain).
- Fernándes de Sousa, MM & García González de Lena, G., 2010. The localized irrigation system. Agrifood Technology, nº 14, pag. 25-32.