How to Grow Kiwis: Complete Guide on Kiwi Cultivation
Hello farmers. In this article we will explain everything you need to grow kiwis in your garden or plantation. We will talk about the most suitable climate, type of soil, how to plant and the keys for its fertilization and irrigation. Here we present a complete guide on the cultivation of kiwi.
1. Characteristics and peculiarities of the kiwi
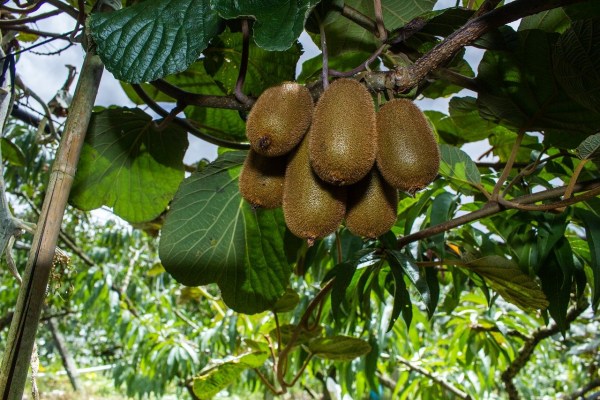
The kiwi, called Actinidia chinensis, is a plant belonging to the Actinidiaceae family. Its origin is in China, which holds the first position in the world as a producer of this fruit, followed by Italy and New Zealand. In Spain its production is quite recent, barely 40 years old, concentrating mainly on the Cantabrian Coast. In fact, in Asturias, kiwi cultivation has become the second most important fruit tree, only behind the apple tree.
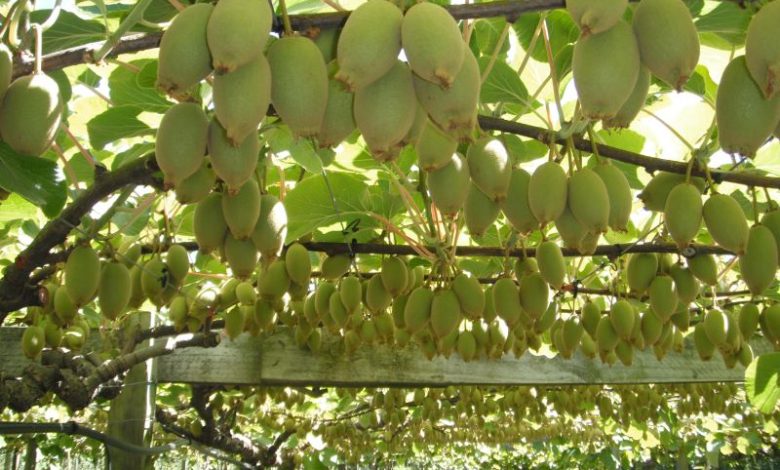
At first we might think that the kiwi is a tree, although in reality it is not. It is a climbing shrub, more similar to a vine, that needs support structures for its growth.
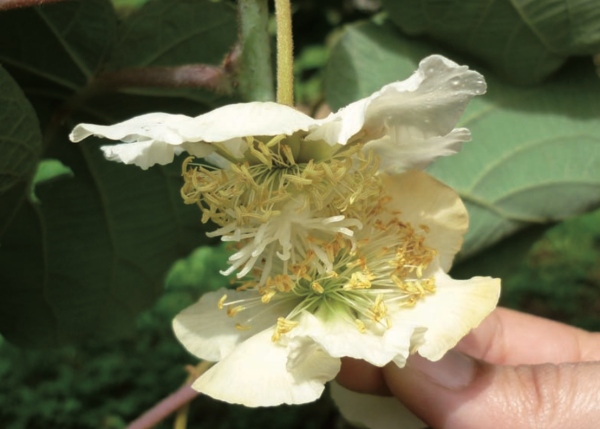
Another curious fact is that it is a dioecious species, which means that we will have male plants and female plants and that we will need both specimens to obtain fruit. The males are responsible for producing the pollen and only the females will produce the fruits.
This pollen is transported to the females mainly by the action of insects (entomophilous pollination) although the wind also plays an important role. In some plantations, pollination is carried out artificially, because this period can coincide with abundant rainfall that makes it difficult for insects to work.
2. What is the most suitable type of climate?
The weather is going to be one of the main determining factors for planting kiwis in our orchard, so we must pay attention to the following aspects: late frosts, cold hours, temperatures, rainfall, relative humidity and wind.
2.1. late frosts
The kiwi begins to flower between March and April, therefore, before deciding to plant it, we must make sure that spring frosts do not occur in our area, since if so, they would cause significant damage to the plant and the harvest.
2.2. cold hours
The hours of cold are an aspect to take into account in deciduous plants that, with the arrival of winter, go into rest and “fall asleep”. In order for them to “wake up” again, they have to accumulate a number of hours of the day in which the temperature is below 7ºC. This number of hours is what is agronomically known as cold hours. Once the tree has already accumulated the corresponding number of hours, it begins to sprout and begins to bloom.
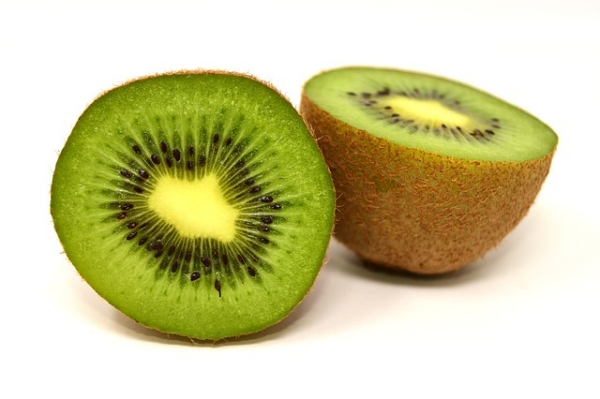
In the case of kiwifruit, the hours of cold depend on the variety, for those with yellow flesh, about 300-400 hours would be necessary, while for those with green flesh, the needs are 600-800.
23. Temperature
As we have already mentioned, the kiwi is very sensitive to spring frosts. Temperatures below -1.5ºC in the months of March or April can cause significant damage. However, after the leaves fall, that is, during the winter, it can withstand temperatures of -15ºC.
During the flowering period, it is not recommended that temperatures exceed 26ºC in the area, which, added to low humidity, could cause pollen dehydration.
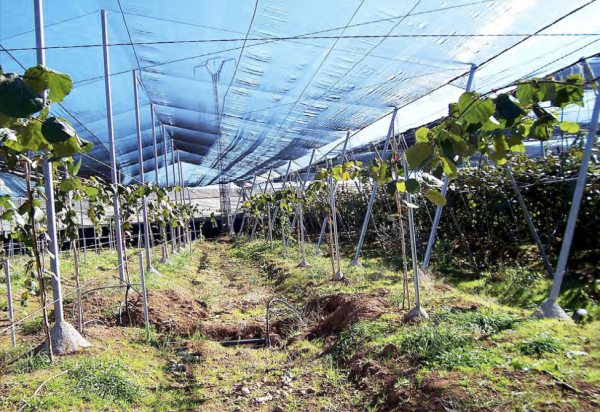
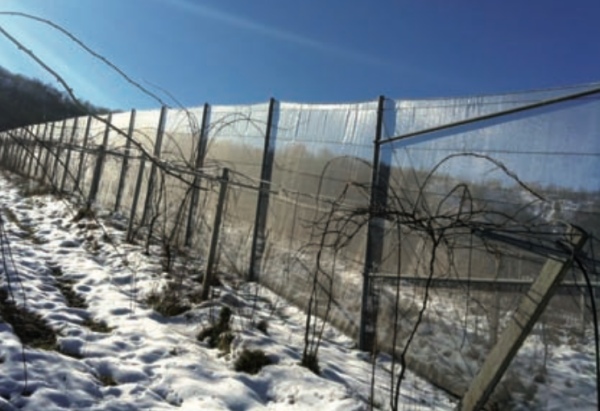
As for the summer, if temperatures exceed 35ºC, leaf burns and defoliation can occur. For this reason, in areas such as the Valencia Community, shading techniques such as the placement of meshes are used.
2.4. Precipitation and humidity
Kiwifruit is a crop that requires significant amounts of water, therefore, if our area does not have abundant and evenly distributed rainfall throughout the year, it will be quite likely that we will need to incorporate an irrigation system.
On the other hand, the environmental humidity of the area must also be high, with the ideal range being between 70-80%. To improve this aspect, micro- sprinkler irrigation can be installed near the foliage area, although installation and maintenance would be considerably more expensive.
2.5. Wind
The wind is another of the climatic factors that condition the cultivation of kiwi. Gusts greater than 30 km/h cause damage to the branches, which is why in most cases it is necessary to build structures that act as windbreaks. Later we will explain some of the options that we can choose.
2.6. What areas of Spain meet the climatic requirements of the kiwi?
If we take into account everything said above, the northern plateau and the mountain areas should be ruled out due to the incidence of late frosts. The southern plateau would also not be optimal due to the low relative humidity. Therefore, we could only grow kiwis in coastal areas, with a low probability of late frosts, in which 26ºC in spring and 35ºC in summer are not frequently exceeded, which in Spain would correspond to the Cantabrian coast.
This does not mean that they cannot be grown in other places, as long as we take additional measures, such as shading, in case of high temperatures, or installing micro-sprinklers near the foliage if the relative humidity is below 60%. Both techniques would increase costs.
3. What type of flooring is most appropriate?
The most appropriate soils are those with a sandy-loam texture, permeable and with good drainage, since the kiwi is very sensitive to waterlogging and root suffocation, therefore, clayey or very heavy soils should be ruled out. It is also very sensitive to the presence of active lime, chlorides and basic pH. The optimal pH range is between 5-7.
Although, these would be the characteristics of an ideal soil, which does not mean that it cannot be cultivated in other soils by applying strategies that mitigate these factors, such as contributions of organic matter, use of ridges, drainage techniques, etc.
4. Previous work
Once we know that our orchard or plantation is located in a suitable area to grow kiwis, the next step will be to prepare the land.
4.1. land tillage
The objective of this operation is to loosen the soil, so that the soil is loose. If it is an orchard or a small piece of land, we can use a motocultor or motoazade, which are small agricultural machines.
If, on the other hand, what we are going to do is a larger plantation, it would be convenient to carry out a subsoiler pass at a depth of about 80 cm, in case we have a very compacted soil, with little aeration or with a depth less at 1 meter. Milling could also be done just before planting.
4.2. background subscriber
The background fertilizer is one that is applied in depth once the land has been tilled. With this, we will be able to get a higher yield in the event that we have soils poor in nutrients or organic matter.
It is difficult to talk about figures without knowing what type of soil it is and without prior analysis. Although, these would be approximate amounts for a soil with a loamy texture, with a pH between 6 and 7:
| dose/ha | dose/ m2 | |
|---|---|---|
| Manure | 70-80t | 7-8kg |
| P2O5 _ _ _ | 200-300UF | 0.02-0.03UF |
| K2O _ _ | 200-300UF | 0.02-0.03UF |
t= ton; UF=Fertilizer Units
4.3. ridges
In soils prone to waterlogging, with low permeability or shallow, it may be necessary to make ridges. The ridges are «earth mounds» that serve to raise the height of the plant with respect to the ground, so that the effects mentioned above are attenuated. The dimensions of the ridges must be at least 1 meter wide and about 40 cm high.
5. Acquisition of plants
The best thing to do to get the plants is to go to a nursery. In this way we will obtain the fruits before, we will be able to choose the variety and we also know the sex of the individual. As we mentioned at the beginning of the post, the kiwi is a dioecious plant (male plants and female plants), so we will need at least one individual of each sex. In the case of large-scale plantations, the usual ratio is to plant 1 male for every 8 females.
6. Support structure
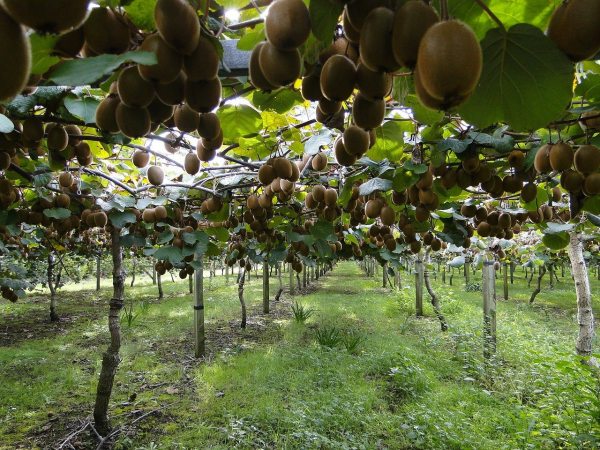
The kiwi is a climbing plant, which means that it requires a support structure to grow. This structure must be placed before starting with the plantation.
There are several types of support systems for kiwi cultivation, but the most common is the T-bar, which consists of a cross-shaped structure joined to the next by 3 threads. The usual planting frames are usually 5×2, 5×2.5 or 5×3 (distance between rows x distance between plants in the row):
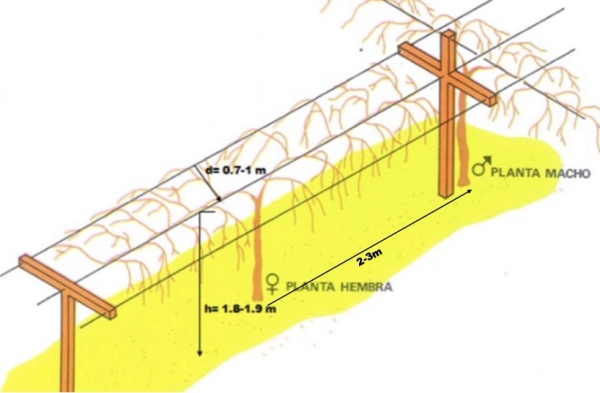
When building the structure, we must bear in mind that it must be able to withstand most of the vegetative fraction of the plant and the entire weight of the fruits, so it must be well anchored to the ground and built with good quality materials. Normally metal, wood or reinforced concrete is used, although the latter considerably increases costs.
7. Windbreaker
As we explained in the climate section, the kiwi is a plant sensitive to moderate winds, so in most areas it is necessary to install windbreaks, which we can divide into 2 groups:
- Natural windbreaks: trees of the cypress or yours type are usually used. The downside of this alternative is that they could compete with the crop for resources.
- Artificial windbreaks: we can use plastic mesh and wooden poles for its construction. This option has the drawback that it is more expensive than natural windbreaks.
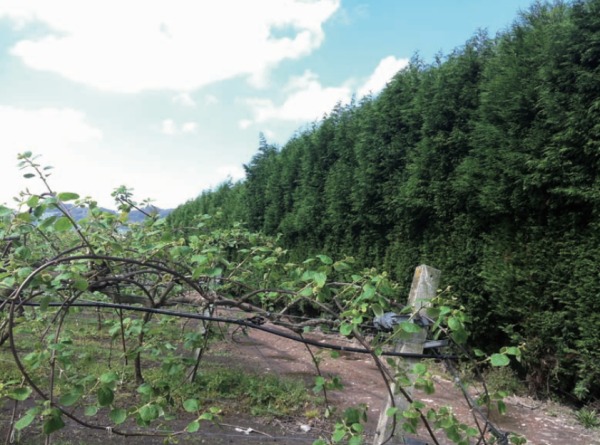
Whatever we choose, windbreaks should be placed perpendicular to the prevailing wind direction, taking care not to overly shade the crop.
8. Plantation
8.1. Distribution of males and females
As we have already mentioned, the usual proportion is usually 1 male for every 8 females. In addition, we must place another male at the ends of each row to ensure correct pollination. The females will be located between the posts of the support structure.
For large plantations, the location of each plant in the plot should be marked. For this, we can use the tutors that we are going to use to guide the plant
8.2. making holes
Once we have already acquired the plants, built the support system and the windbreaks, the next step will be to plant the kiwis. The best time to plant is late fall to early spring. The holes must be made of such a size that the roots can be well stretched and placed radially. They will then be covered with soil up to a height that does not exceed the neck.

8.3. tutored
Staking is a technique that consists of guiding or directing the plant by tying some of its branches to a stake, in such a way that it has a support to lean on and thus be able to grow correctly. To do this, we will use stakes that are of such a length that the end reaches the height of the thread of the support structure.
9. Pruning
There are 3 types of pruning in kiwi cultivation: formation pruning, fruiting pruning and green pruning.
9.1. formation pruning
It is carried out during the first 2 or 3 years and its objective is to give the plant the correct structure. The first pruning must be done after planting and will consist of cutting off the stem to the part where it reaches 1 cm thick. After said cut, more stems will come out that we will have to cut, leaving only 1; this has to be the strongest and thickest. Once the main stem has been chosen, we will trim it as before (until the part where it reaches 1 cm thick). We will repeat this operation as many times as necessary, until its height approaches that of the central thread of the structure and it already has the appropriate thickness. Once the necessary height of the main stem is reached, we must select two secondary branches. We will choose two that have a good thickness and we will tie them to the central thread in opposite directions.
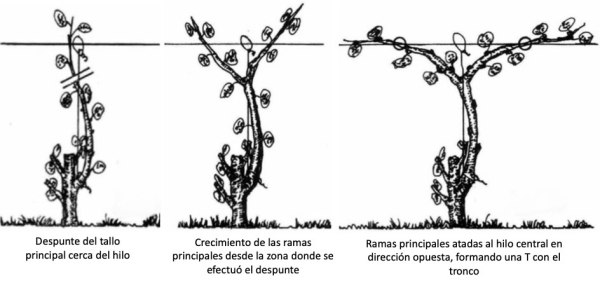
During the summer, we will also have to trim the 2 main branches that we had tied. With this we will get new secondary branches to sprout from them. These branches must be separated at about 30 cm from each other, in case there is one at a shorter distance, we must eliminate it. The objective pursued is to achieve a structure similar to that of the following scheme:
9.2. fruiting pruning
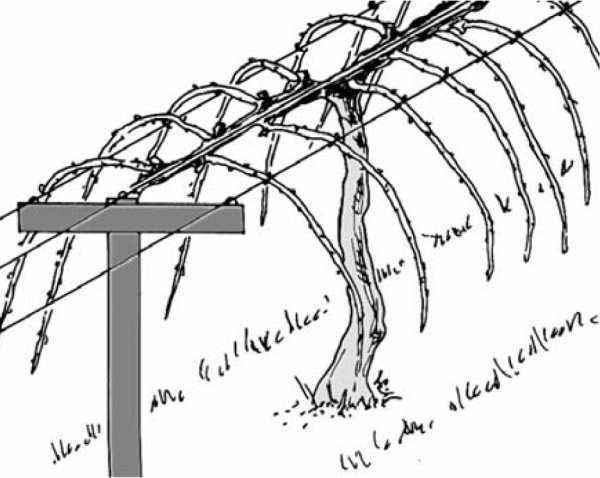
This pruning is done in winter, from the end of the harvest until the end of January. Kiwi fruits, as occurs with the vine, come from the shoots that emerged that same year on the branches formed the previous year, that is, we are not going to obtain fruits from shoots that have already borne fruit in another year. Having said that, we will have to eliminate the lateral branches that already produced fruits the previous season, keep the ones that will give us the fruits this year and tie them to the lateral threads of the structure.
9.3. green pruning
This type of pruning is what is done in spring, when the tree is in vegetative activity. What we are looking for with this pruning is to improve the aeration of the plant, achieve a more uniform incidence of sunlight and a more balanced distribution of resources. To do this, we will sprout 3 or 4 leaves located after the last flower bud of all the indeterminate shoots. Indeterminate shoots are those that do not stop growing, but continue to grow while curling up on themselves.
We will also have to remove the shoots that are too big and the suckers. The suckers are branches that come out of other old ones and that are not going to produce fruits. We can recognize them because they will not have flower buds.
10. Fertilization
The kiwi is very sensitive to the presence of salts in the soil, so the best method would be to incorporate the fertilizers through the irrigation water, which is known as fertigation or fertigation. This technique allows the fertilizer dose to be adjusted much more precisely, reducing the possible accumulation of salts.
Regarding nutritional needs, the following table shows the approximate dose of nutrients for a soil with intermediate properties and an adult plantation of about 6 years of age:
| Nutrient | kg/ha |
|---|---|
| Nitrogen | 150 |
| Match | 50-70 |
| Potassium | 150-200 |
| Calcium | 60-80 |
| Magnesium | 30-40 |
11. Irrigation
The kiwi is a fruit tree that is very sensitive to water stress, both due to excess and deficiency. It does not tolerate waterlogging or drought, both situations causing damage to flowering, fruit production and harvest.
It will require significant amounts of water and, in areas with relative humidity below 60%, it will be necessary to implement humidity diffusers or shading techniques, ensuring that the percentage of humidity is above 75%.
These water requirements will be lower in those areas where rainfall is more abundant and homogeneous, for example, northern Spain, where most of the country’s kiwi production is concentrated.
In addition, the type of soil should also be taken into account: shallow depths or high sand content mean that water requirements are greater.
If we relate the stages of the crop cycle with its water needs, we distinguish 3 clear stages:
- From budding to flowering (April-May), the amounts of water will be less since the temperatures are not yet too high and the water in the soil has not yet been consumed. During this period the tree is most likely to experience stress from excess water.
- From June to the end of summer. This stage coincides with the growth of the fruits, so it will be when the plant demands a greater amount of water.
- From the beginning of autumn to mid-November (harvest). At this time of year, temperatures are not so high and rainfall is more frequent and abundant, therefore, irrigation supplies must be reduced.
As for the irrigation system, given the marked sensitivity to water stress of the kiwi, added to the need for high relative humidity, make microsprinkling the best option, since the use of diffusers makes it possible to maintain correct humidity more easily..
12. Bibliography
- David, M.A., Yommi, A., and Sánchez, E., 2020. Site selection and planting of the kiwifruit crop. Buenos Aires. INTA Editions, Balcarce Agricultural Experimental Station.https://inta.gob.ar/sites/default/files/inta_kiwi_eleccion_del_terreno_y_plantacion_ebook.pdf
- García Rubio, JC, García Gonzalez de Lena, G., Ciordia Ara, M. Kiwi cultivation. SERIDA, Ministry of Livestock Farming and Native Resources of the Principality of Asturias.http://www.serida.org/pdfs/6344.pdf
- Malagón, J., 2014. Management and profitability of kiwi cultivation in the Mediterranean area.Fruit Growing Magazine, (33).https://agroambient.gva.es/documents/163228750/173203739/Manejo+y+rentabilidad+del+cultivo+del+kiwi+en+la+zona+mediterránea.+2014.pdf
- Malagón, J., Cultivation of the Kiwi. Technical sheet. Department of Agriculture, Rural Development, Climate Emergency and Ecological Transition, Generalitat Valenciana https://agroambient.gva.es/documents/163228750/173203739/CULTIVO+del+KIWI.+Ficha+Técnica..pdf
- Yommi, A., et al., 2018. Kiwifruit: Soil Management, Irrigation, and Fertilization. Buenos Aires. INTA editions.https://inta.gob.ar/sites/default/files/inta_manejo_del_suelo_riego_y_fertilizacion_del_kiwi_2018_ebook.pdf
![Photo of List of [15 Indoor Plants Without Flower]: Examples and Care](https://www.complete-gardening.com/wp-content/uploads/2022/08/list-of-15-indoor-plants-without-flower-examples-and-care-390x220.jpg)
![Photo of San Pedro Cactus: [Planting, Care, Substrate, Irrigation]](https://www.complete-gardening.com/wp-content/uploads/2022/08/san-pedro-cactus-planting-care-substrate-irrigation-390x220.jpg)
![Photo of Silver Pothos: [Planting, Care, Irrigation and Substrate]](https://www.complete-gardening.com/wp-content/uploads/2022/08/silver-pothos-planting-care-irrigation-and-substrate-390x220.jpg)
