Tips for Sizing an Orchard. How to make the design
Very good to all Agrohuerters! Today I come to tell you a little about the hardships I went through the day I had to dimension an orchard, that I had to completely manage the plot of land for the orchard.
As I already told you in the article: First step: Where to locate the garden? The soil in which I decided to locate my garden had never been worked and it was necessary to condition it properly so that it would give a decent production, had adequate drainage, good porosity and there were no impediments to the sprouting of the seeds such as stones and crystals.
How to size a vegetable garden
Being an agronomist project it would have been very sad if nothing grew, so I dedicated a lot of effort to carry out this work with my friend Cristian, I take the opportunity to show you the video where we set up all this shed and so you get an idea of the work we do:
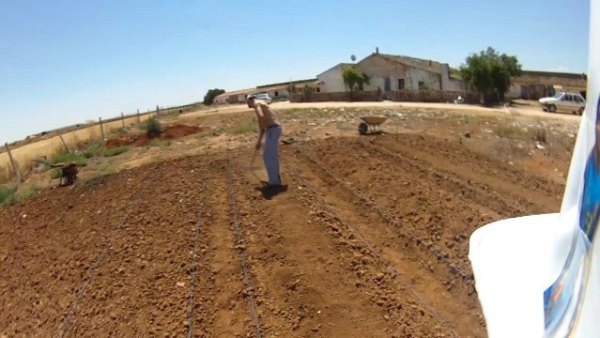
The first thing we had to do to improve our soil was to pass the Motoazada or mechanical mule, this tool allows to remove the superficial layer of the soil when passing the strawberries through its surface, with this we get the soil to improve its structure, its drainage conditions, its aeration and water infiltration capacity, etc.
Once this was done, I had two options for designing the architecture of the farm:
1. Create raised beds
I suppose you have seen them several times in this blog, in the article on How I prepare my garden to see its construction in the photographs that Paolo left us in the comments section.
Raised beds have the advantage of:
- They facilitate the work in it by not having to lean too much.
- The materials with which they are normally filled, straw padding, etc. They prevent losses by evaporation.
- Weed control is easier as the dimensions of the bed are delimited.
- The work is reduced by not having to stir or renew the soil of the terrace.
- They can be built with various recycled materials.
2. Create ridges
This technique was easier for me since I had no plans to buy bricks or boards and fertile soil to build the raised terraces and I could use my own land to make them.
Ridges have the advantage of:
- The fertile fraction of the soil is increased by concentrating the layers of superficial soil (richer in organic matter) of the corridors in the terrace.
- Furrow or blanket irrigation is favoured, a common practice in conventional orchards.
- The tasks are carried out more comfortably from the corridors without the need to step on the terrace, caking the earth on it.
It was infernally hot to make the ridges, but I had little time if I wanted to plant the orchard for the appropriate dates and I had no choice but to take the shovel and start digging, I think that day I lost like a Formula 1 driver after a race but the final result was very worth it to see how we transformed the vacant lot into an orchard apprentice.
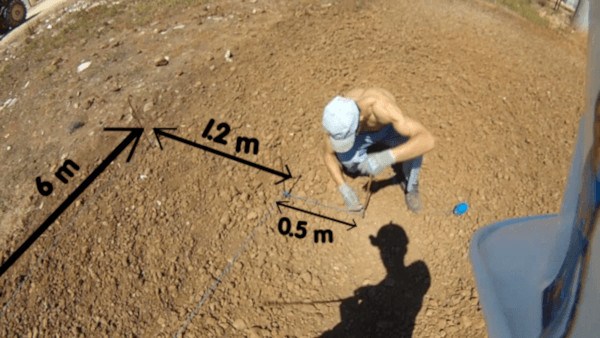
Better dimensions for the orchard
When designing the architecture of the crop, I applied a lot of efficient management concepts so as not to break my back working on it.
Basically I decided to make the terraces 6 meters long x 1.2 meters wide with a 0.5 meter corridor in between.
And you may ask: why 1.2? Because it is the most appropriate measure to be able to work on the terraces from the corridors without forcing too much posture. With this measure of terrace it is not necessary to step on it to reach inaccessible areas, etc. This measure is recommended in many ecological methods such as Crested Walls, the Fukuoka method and Synergic horticulture.
Once we had the corridors and ridges ready, with a rake we level the soil deposited on the terraces, with this we avoid depressions that can concentrate the irrigation water and facilitate planting.
With the ridges ready, to improve management in the orchard we decided to place an anti-weed mesh, this technique is known as inorganic mulching and consists of covering the crop with plastic:
By keeping the soil covered, we reduce its erosion, maintain humidity and regulate temperature changes. Depending on the color of the plastic, the benefits will be different, as follows:
- A black plastic: Retains sunlight due to its color (black absorbs radiation) this prevents the rays from penetrating inside the plastic, making it difficult for weeds to sprout.
- A white plastic: It keeps the soil fresh, although it is not very efficient for weed control.
- A silver-black plastic: They are the most effective in reducing the population of insects, thus avoiding many pest vectors for our orchards. Its color also helps control weeds.
- A transparent plastic: Allows the sun’s rays to penetrate inside, which favors the germination of the seeds as the soil is warmer. With this type of plastic, the Solarization technique can be carried out, which consists of watering the soil and covering it with a plastic of this style, the heat will be such inside that it will disable the seeds of weeds and eliminate the pathogens that can exist.
Inorganic mulchings can be made with other materials such as volcanic stones, etc. But they do not provide organic matter or other nutrients like organic mulchings.
As you can see in the previous video, we fixed the mesh with some grids, with this it is easier to walk through the corridors but with the heat at that time it was hard for me and it helps to move them
A little more, I hope that with this you have a clearer idea of the possibilities you have when it comes to sizing your garden. It’s hard work but then it gives a lot of satisfaction.
All the best
![Photo of Pests and Diseases of Bananas: [Detection, Causes and Solutions]](https://www.complete-gardening.com/wp-content/uploads/2022/08/pests-and-diseases-of-bananas-detection-causes-and-solutions-340x220.jpg)


![Photo of Nymph Care: [Earth, Moisture, Pruning and Problems]](https://www.complete-gardening.com/wp-content/uploads/2021/06/5186DMQFYgL._SL500_-390x220.jpg)