How to make a homemade Composter – Make a Composter with Pallets Step by step
Do you want to make homemade compost? The first thing you will need is the compost bin, also called a composter or composter. Today we are going to see what are the steps to make a homemade compost bin with wooden pallets.
In this case we have bought new pallets, although you can also make a compost bin with recycled pallets, with reused wooden boards, etc.
First we will review what are the materials to make a composter with pallets, and then we will see how to make the composter step by step, with photos of how we have done it.
This is an easy DIY activity that you can do even if you have no previous experience and can even be done with children.
It took us a morning to get the compost bin almost ready, and everyone – small and large – really enjoyed these outdoor tasks in the garden.

After our experience, I believe that making a homemade compost bin is a perfect activity to include in kindergarten and primary school garden projects, as it fosters teamwork, task organization and spatial vision, among other things..
✅ What is a composter or composter
A composter, composter or composter is a kind of box or drawer in which organic remains (from the orchard, garden or kitchen) are introduced for the manufacture of compost or homemade compost.
Compost or compost is one of the most complete ecological fertilizers for the nutrition of garden plants. It is a natural fertilizer that we can easily find in any garden store and that, in addition, we can obtain at home whenever we have a compost bin or composter.

There are several types of composters, of different shapes, sizes and materials: plastic, metal mesh, wood, made with metal drums… And with different uses: portable composters, vermicomposters to make earthworm humus, rotating cylindrical composters, composters of plastic to have inside the house, wooden composters made with pallets or fruit boxes…
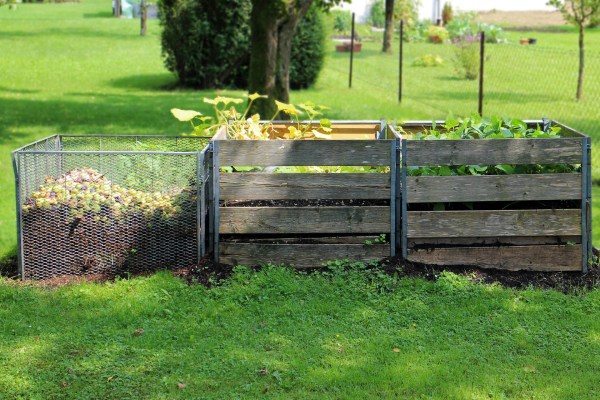
Today we will focus on one of the most common types of compost bins in community urban gardens: the wooden compost bin made with pallets.
Materials to make a composter with pallets
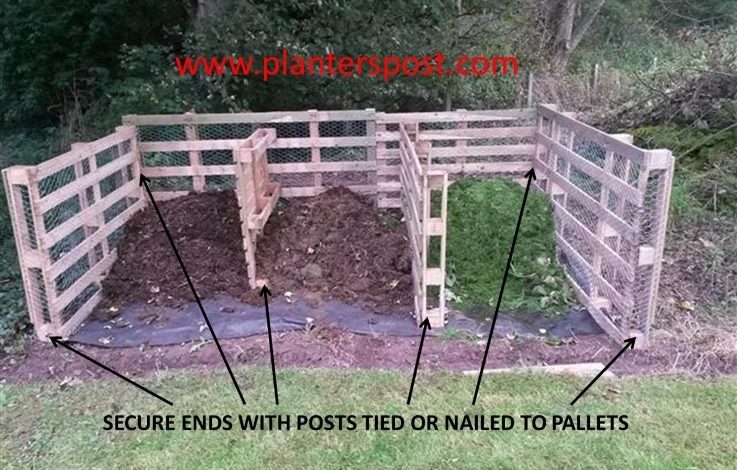
In our case, we decided to make a composter with two compartments or compost bins, so we used 7 pallets in total: 5 for the structure and 2 for the doors of the composter (leaving the upper part free, in this case).
A three-drawer composter could also be made -like the one in the photo on the top left-, for which 5 pallets would be needed to make up the structure and another 3 for the doors.
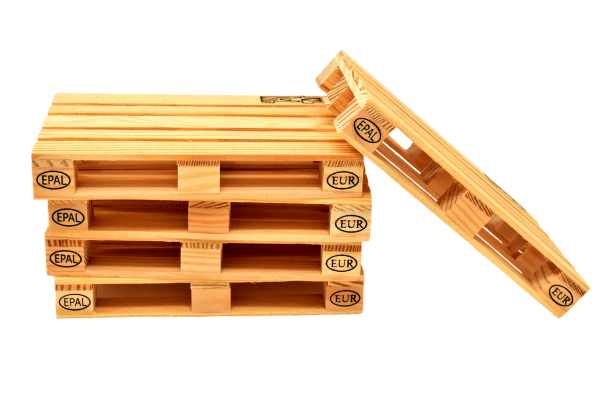
We use wooden pallets, but recycled plastic pallets could also be used to make the composter.
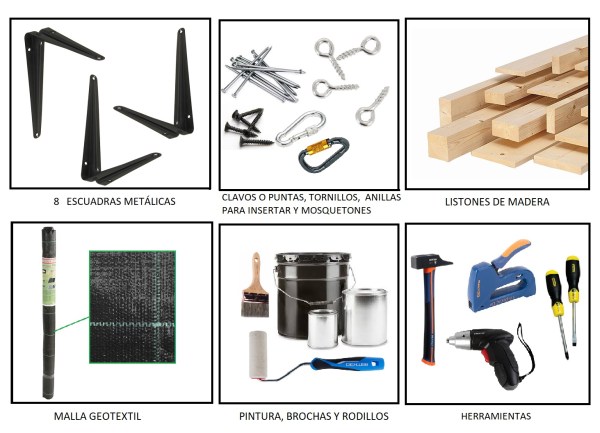
Materials to make a homemade compost bin:
- 7 equal pallets
- 8 metal brackets
- Screws, nails or steel points, carabiners and rings
- Wooden slats or slats
- Water Permeable Geotextile Mesh
- Exterior wood paint
- Tools: hammer, screwdriver, stapler, paint brushes or rollers…
- Materials to make compost (with which we will fill the compost bin)
How to make a wooden compost bin step by step
First of all clarify that there is not a single way to make a composter, since, as we have seen, there are many types.
The steps to make a compost bin that we have followed and that we will see below are one option, but there are many others…
Depending on what we like, the space we have, and the time or the skill to do DIY activities, we can choose a simple composter (like the one we have made) or more elaborate composters like this one:

Source: https://backyardfeast.wordpress.com/how-to-build-the-ultimate-compost-bin/
Different mechanisms can be assembled for the doors or the lid of the composter (such as hinges, «removable» slats by rails…), although to make our composter easy, we have chosen the simplest: simply leave the doors resting on the structure of the compost bin and fasten them with rings and carabiners. We see it below in the steps to make a compost bin !
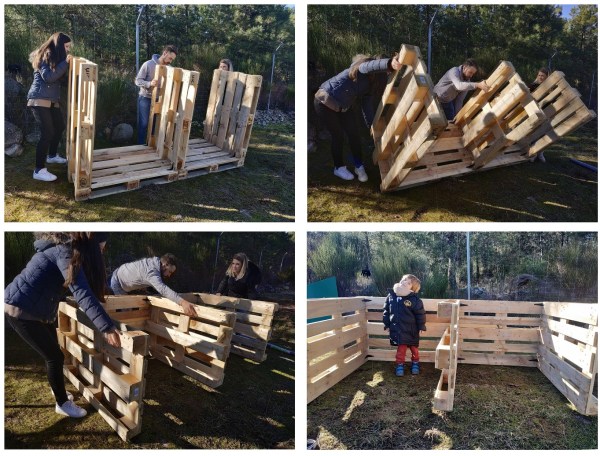
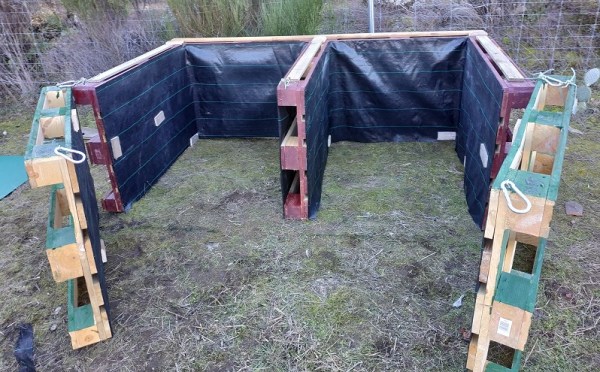
1. Join the pallets to assemble the structure of the compost bin
First you have to join the two pallets that will form the front wall of the compost bin (on the opposite side of the doors). For this we will support the pallets on the ground and we will help ourselves, as seen in the photo on the left, of several wooden slats so that the pallets are together.
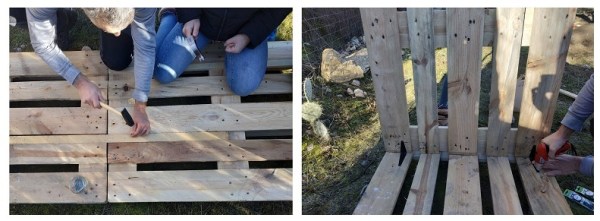
Let’s fit the slats in the gaps between the slats of the two pallets and we will reinforce it by nailing several nails or steel points that fix each slat to the two pallets.
The next step, as seen in the photo above to the right and in the one below, is to attach the pallets to the front, which will be the side walls of the composter and the central separator.

For this we will use the metal brackets, fixing them with several screws to each of the pairs of pallets that must form a right angle.
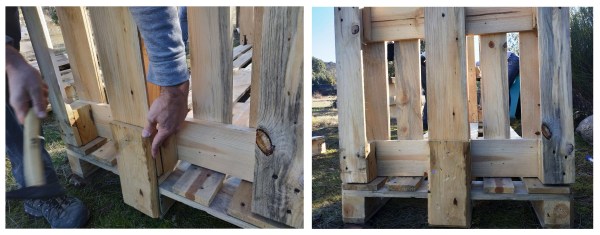
First, with the help of the metal brackets, we fix the two pallets of the side walls and the one of the central division to the other two that we had joined first, and then we will reinforce the joints of the ends with wooden strips.
We found it more comfortable and easier to assemble the compost bin frame in this same position, so we decided to join the pallets this way and rotate the whole frame later.
2. Paint the wooden compost bin
Although we did, it is not mandatory to paint the homemade composter (nor do you do it in Step 2: you can paint or varnish the pallets first -before assembling the structure- or paint the composter only on the outside when it is ready). completely finished).

We decided to paint the compost bin because we thought it was a fun activity to do with the kids and also because a couple of coats of exterior paint will help protect the wood and the compost bin will take longer to deteriorate.

Exterior wood paint or varnish is extra protection for the compost bin. The composter will remain outdoors for years and under rain, cold, sun, heat… With a coat of paint we will increase resistance to these and other inclement weather.
3. Line the interior of the compost bin and the doors with geotextile
The next step is to protect the composter and the inside of the doors with a geotextile mesh. This step is also not mandatory, but, like painting, it is a way to protect the wood and help it last longer.
To line the compost bin and the doors with the mesh, you can choose different types of fixings, we did it with staples, which we nailed with a manual stapler along the perimeter of the six internal faces and the doors.

In some central areas we also reinforce it by attaching small wooden strips to the pallets that we nail with steel points on the mesh.
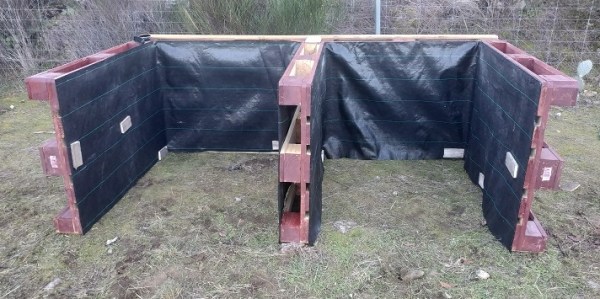
It is essential to use a mesh that is breathable and permeable to water. This is very important since for the formation of the compost it is necessary for air to enter the heap and also that, if it rains, the water can come out of the box and the composter does not become waterlogged.
4. Attach the doors of the compost bin
Finally, before putting the doors, we reinforce the structure. To do this, we nail a strip about two meters long and 1 cm thick joining the two front pallets at the top.
As we saw at the beginning, there are many alternatives to mount the doors of the composter. This is perhaps the simplest of all, since no hinges or any other mechanism are needed.
The wooden pallets are quite heavy and can be supported well on the ground and on the structure of the compost bin, so it is simply a matter of giving a little extra support to prevent the doors, superimposed on the front holes, from falling with the wind or rain.
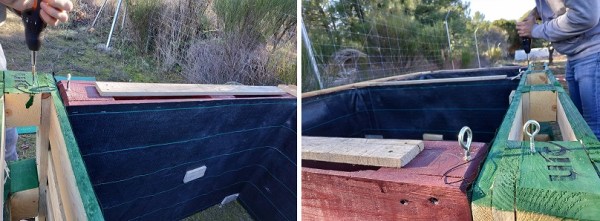
4 insert rings and two carabiners are needed for each door of the compost bin. In our case, the end joints are the ones that will always remain fixed, so they could also have been joined with flanges or ropes. This is how our homemade compost bin with doors turned out:
Making homemade compost in a wooden composter
After making the homemade compost we have to make compost with the waste from the garden, the garden and the kitchen.
Although we will see the most basic below, you have more information about the different types of compost, the materials that can be used to make it, and other tips on how to make compost in the post What is homemade compost and how to do it.
Materials to fill the compost bin
This is a sample of some of the composting materials we use to fill our home compost bin:
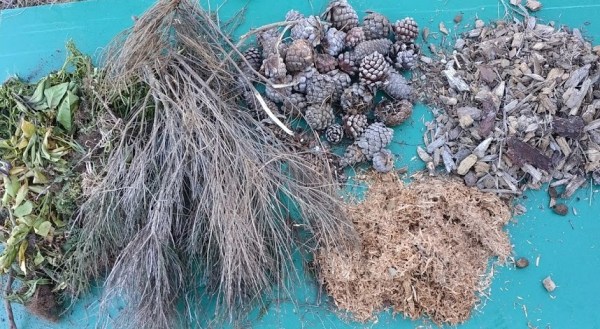
In addition, we added a couple of wheelbarrows of horse manure, wood ash and leftovers from the kitchen such as fruit peels, egg shells, etc.
How to fill the composter
The best way to make homemade compost is to add the different materials to the compost bin in layers so that later, when stirring, it is as homogeneous as possible.
To start filling the homemade compost bin, the ideal is to alternate dry materials with more humid materials. We first put the brooms and a layer of manure, then the straw (drier), and, on top of it, another layer of manure that we covered with bark and pineapples. Finally, we add the green remains of grass and other crops that we cover again with straw and manure.

If it does not rain it is very important to water the compost in formation from time to time, as well as adequate aeration. It can be watered with a hose or a watering can once or twice a week. To aerate it, you have to turn it over with the help of a pitchfork or a shovel so that the water and oxygen also reach the material inside the composter.
As seen in the photos, we started by filling just one of the two compost bins. The goal of this is to have one more mature or older compost bin and one more recent one. In the second we will add the new kitchen and garden remains. When the first compartment is full, we will let it mature and start with the next one. You can use some of the more mature compost to add to the second compartment to get the process started faster.
I hope you liked the post and that, if you want, you can contribute your experiences, photos and comments on how to make homemade compost in the thread below. Cheers!
References
- GRAMA Association – Action Group for the Environment (2005). Manual of the good composter. Basic guide to composting
- Ministry of the Environment and Rural and Marine Affairs, Government of Spain (2009). Composting Manual
- Shibu K. Nair, Thanal Agroecology Center (2011). pot composting
- Cornell Waste Management Institute, Cornell University, USA (2011). Composting at Home – The Green and Brown Alternative
- FAO (2013). Farmer’s Composting Manual. Experiences in Latin America
- Ministry of Agriculture, Fisheries and Rural Development, Junta de Andalucía (2014). Composting Manual for Organic Farming.
![Photo of Boletus Edulis: [Characteristics, Cultivation, Harvesting]](https://www.complete-gardening.com/wp-content/uploads/2021/06/boletus_edulis_1601461386-390x220.jpg)