Worm compost: What is vermiculture and how to make homemade compost
We are going to continue delving into the subject of fertilization or fertilization, dedicating today’s post to earthworm humus, earthworm compost or vermicompost. As we have seen in other articles, there are many types of organic fertilizers that we can use to improve or fertilize the soil. Organic fertilizers such as manure, garden compost, mushroom compost, green manure, worm compost, compost tea, liquid organic fertilizers…

Today I will try to explain in an easy way what vermicompost is (also called vermicompost or vermicompost) and how to make homemade vermicompost, and in the next article we will learn first-hand about the experience of some students from the Madrid School of Agricultural Engineers , who carry out the vermicomposting technique in the ETSIA practice fields and who make their own earthworm humus.
What is worm castings and what is it used for?
Worm humus is a type of compost that is formed thanks to worms that help break down organic remains. Like vegetable compost, vermicompost can be formed in a heap on the ground or in a «vermicompost», which is what the container or composter is called in this case.
(If you have never heard of “composting” before, I recommend that you first read the article “ Composting in the garden, a good ecological technique ”)
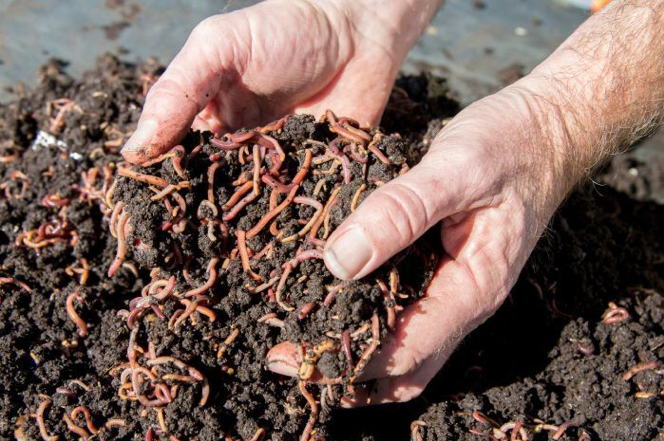
What the worms do in the vermicompost is speed up the composting process (the conversion of kitchen scraps and vegetable scraps into humus). The worms feed on the materials introduced into the vermicompost and then excrete a humic substance that is very nutritious for the plants, a compost that slowly releases nutrients and retains water quite well. In addition, the liquids or «leachates» that are formed can be collected and are also a magnificent natural liquid fertilizer.
Due to its quality, earthworm humus or earthworm compost is one of the most widely used manures or fertilizers in organic farming.
How to make compost with worms or vermicompost
If you don’t have room or time to create vermicompost in your own garden, you can buy it in some specialized fertilizer stores, or horticulture and gardening stores, or buy it from vermicompost producers who sell it directly to the public (many of them offer their products through Internet, such as the Dishumus company).
If you prefer that the worm humus be produced in your own garden, the first thing you will have to do is find a place for the worm farm: it must be a cool place (preferably in the shade) because, unlike vegetable compost, compost of worm does not require high temperatures, what’s more, if too high temperatures are reached, the worms could die.
You can buy the vermicompost already assembled or make it yourself, you will only need several plastic containers, a drill and not much else…).
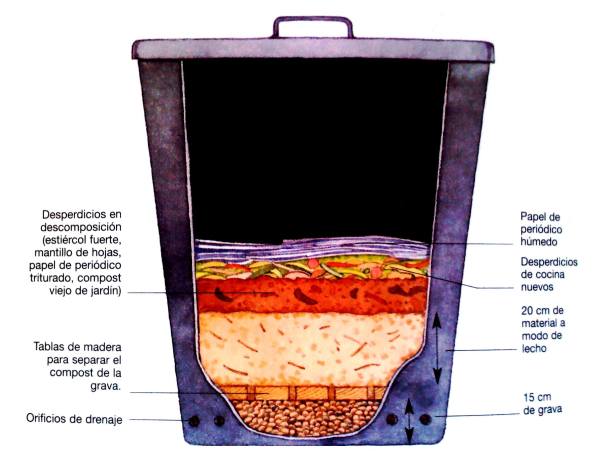
If you use several containers or drawers, they should have holes so that the worms can pass from one to another. But you can also choose to use a single container and make different layers that the worms pass through freely: you will only have to make a separation to create two spaces: one with all the materials in layers and another for the collection of leachate. Here’s an example:
What are the needs and characteristics of the earthworm to make compost?
To make worm castings it is very important to build the right habitat for the worms. In order for them to produce a good worm compost, it is very important that they are comfortable and can live and feed well. For it:
- You must create a good «bed or bedding» with fibrous materials such as strips of cardboard, paper, straw, dry grass, coconut fiber, sawdust…
- You will introduce on it a layer with the soil or vegetable compost and the worms (now we see which ones).
- Every few days, you must add what will be the food for the worms: organic remains from the garden, fruit, vegetable, bread, eggshells and other remains of our food (if you chop or crumble them, the worms will eat them faster, they will grow and reproduce more and vermicompost will form sooner).
- Do not introduce: meat, fish, fat or oil, dairy products or too many citrus fruits (because they acidify too much).
- Do not add more food than necessary. If the vermicomposter begins to smell too bad, it could be because the worms do not have time to decompose everything and it rots… If this happens or if you see that there are still undecomposed food remains, wait a few days to add more remains to the composter.
- You must keep the composter moist and cool so that the worms are comfortable and do not leave: spray or sprinkle water every two, or three days at most.
- Add moist fibrous material (the one from the litter) once a month or if you see that the worms have already finished with it.
What worms to use to make worm compost?
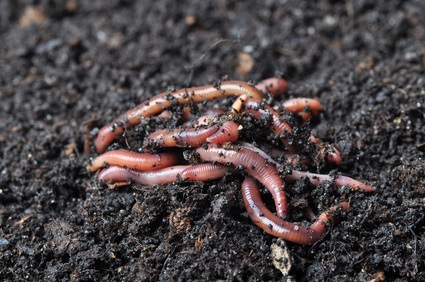
The worms to make compost can be bought or caught in the garden. The most used is the species Eisenia foetida (earthworm, red worm or Red worm), but you can also buy Eisenia hortensis.
If you want to know more details about the characteristics of worms and see a practical example on how to make worm castings or vermicompost, here is a link that will be very helpful. In it we tell the experience and advice of some guys who do vermiculture at the School of Agricultural Engineers in Madrid. I hope it works for you!
References
- Castillo, AE et al., 2000. Chemical and physical characterization of worm compost made from pure and combined organic waste. Technical Agriculture, vol. 60, no. 1, p. 74-79.
- Röben, E., 2002. Composting Manual for Municipalities. Illustrious Municipality of Loja, Ecuador.
- Rivero Hernández, R., 1992. Production of the earthworm Eisenia foetida in controlled environments. Livestock World, 1992-7/8, p. 24-27.
![Photo of Prune Dipladenias: [Importance, Time, Tools, Considerations and Steps]](https://www.complete-gardening.com/wp-content/uploads/2021/06/Podar-Dipladenias-390x220.jpg)

![Photo of Prune Hyacinths: [Importance, Time, Tools, Considerations and Steps]](https://www.complete-gardening.com/wp-content/uploads/2022/08/prune-hyacinths-importance-time-tools-considerations-and-steps-390x220.jpg)