How to make Recycled Self-Watering Pots: Complete Guide
Hello to all dear Agrohuerters! Today we are going to propose a solution to one of the aspects of urban gardening that usually causes the most problems for RURbanites: irrigation. Do you know self-watering pots? Whether it is because we water too much, because we fall short or because we forget, in the end, one of the most frequent causes of the crop or the plants spoiling is that we do not water properly.
Ideas for making self-watering pots
In addition, this topic poses great problems on vacation, especially in the summer, because if we are not at home we have to ask the neighbor for favors so that she can water our plants or leave them to the adventure without watering for a week, which It foreshadows that with the high temperatures that occur at this time our plants will not have much of a future.
For all these reasons, today in this post, accompanied by a video, I am going to explain how to make self-watering pots using just a plastic bottle. Specifically, I am going to make three variants, which are based on the same thing: the substrate takes the water from the bottom of the bottle when it needs it, so there will be no problem of overdoing the irrigation if we do not have a very good hand and we do not have to be aware of watering if we have a tendency to forget this task. If you can’t wait any longer, take a look at the new video of « Agriculture for RURbanitas « !
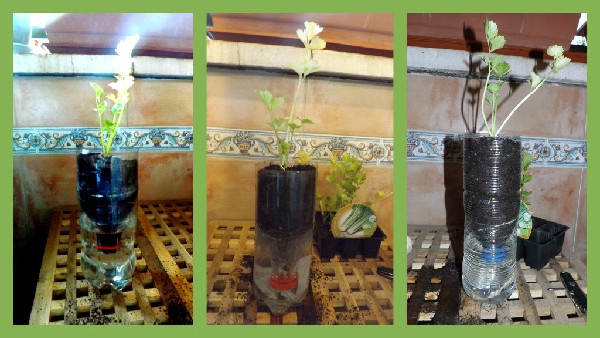
My experience has been quite good, they have been more than a week without any type of irrigation and they have not been badly preserved, despite being celery that needs a lot of water and that the temperatures this summer are very, very high.
So if you don’t have a way to water your plants in summer, I recommend this ECO option: economical and ecological. I leave you some small instructions on how to make your own recycled self-watering pots.
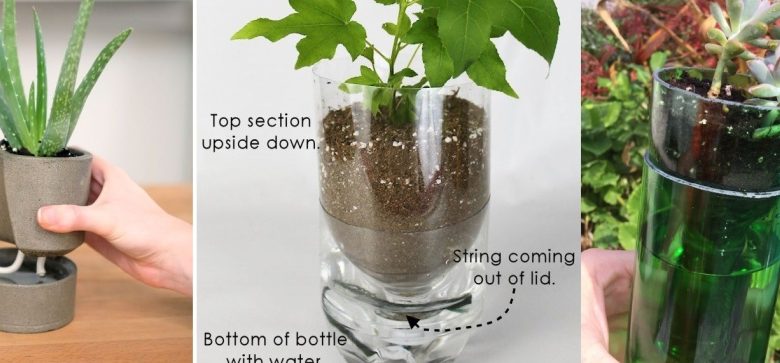
1. Recycled bottle self-watering pots
It is the simplest version. You only need a plastic bottle and scissors. Then, of course, you will need substrate and seedlings or seeds to establish your potted crop.
It is as simple as cutting the bottle in half and filling the part of the cap with the substrate, where we will transplant the seedling or sow the seeds. Once this is done, you must fill the other part of the bottle with water. Remove the cap and fit the two parts together so that the substrate is in contact with the water. If the substrate doesn’t touch the water it won’t be able to “self-water”, so if it doesn’t, just add more water or cut the bottle down to make it shorter. You can also do it with the cap on, but you must first make a hole in it through which the water can pass.
2. Self-watering pots using cotton cloth
For this variant of self-watering pots, in addition to the plastic bottle, you will need a strip of cloth, preferably cotton. In this case, before you start filling the part of the bottle that has the cap with the substrate, you must make a hole in the cap with an awl or a Phillips screwdriver. Once perforated, you must pass the strip of fabric through the hole, in such a way that half of it is on one side of the cap and the other half on the other, and screw it back onto the bottle’s nozzle.
You already know the following steps: fill the substrate container, transplant, fill the other part of the bottle with water and fit both. In this case, it is not necessary for the nozzle of the bottle to be in direct contact with the water, since the cotton cloth will act as a “guide” for it, which rises by capillarity to the substrate.
This implies that the part of the bottle that contains the water can be higher and, therefore, will have a greater capacity compared to the previous case, which means greater irrigation autonomy.
3. Pots with self-watering using esparto rope
Finally we have the variant of the esparto rope. This option is basically the same as the previous one, with the difference that instead of cotton fabric we use rope.
Both in this type of pots and in the previous one, it is important that the part of the rope or fabric that remains buried in the substrate does not remain wrinkled at the bottom, but rather mixes with the soil upwards, as this allows a substantial improvement. in terms of water distribution compared to the first option.
Of course, just like the pots in our Macetohuerto, all of these admit a little imagination and you can decorate them to your liking.
This is all for today, I hope you put into practice these tips on how to make homemade self-watering pots and that you share them with the entire Agrohuerto community. Until next time!
![Photo of Humid Tropical Climate: [Characteristics, Flora, Fauna and Adaptability]](https://www.complete-gardening.com/wp-content/uploads/2022/08/Que-es-el-clima-tropical-humedo-300x225-1-300x220.jpg)
![Photo of Prune Hydrangeas: [Importance, Season, Tools, Considerations and Steps]](https://www.complete-gardening.com/wp-content/uploads/2022/08/prune-hydrangeas-importance-season-tools-considerations-and-steps-390x220.png)