Plant Cauliflower: [12 Steps] + Complete Guide

T he benefits of cauliflower for health, like broccoli,they are incredible.
To eatorganic cauliflowersIt is one of the best things you can do to your body.
If you have come this far, perhaps you are interested in planting them.
Good, I’m glad. Because you have come to the right place. Read this small guide (5 minutes maximum) and apply the steps.
In a couple of months you will havespectacular cauliflowers on your table, ready to eat and homegrown.
Sow Cauliflowers Step by Step:
- When? Throughout the year.
- Where? Fresh air. With direct sun for about 6 hours a day.
- Harvest time? Between 40 and 180 days depending on the variety. That is, a month or six months.
- How do we prepare the land? Neutral pH, between 6.5 and 7. Soil rich in nutrients.

- How do we pay? High content of organic matter and earthworm humus. Well broken down and mixed.
- How do we water? Ideal, with drip.
- How often do we water? At first daily. When the cauliflowers have grown every two or three days depending on the heat.
- How do we sow? 1 cm deep. Leaving a distance of 45-90cm (depending on the crop).
- How do we harvest? Pella must measure at least 15cm. We cut the stem, leaving the leaves that are attached to the pella.
- Good associations? Potato, lentils and onion. Mint and rosemary, nasturtium prevent diseases and pests.
- Bad associations? Brussels sprouts, broccoli and radishes.
- What diseases and pests do they have? Cabbage butterfly, cabbage fly, bugs, cabbage hernia and black foot.
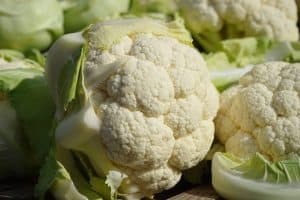 Cauliflower is one of the healthiest types of cabbage out there. Often overlooked by its more popular cousin, broccoli, cauliflower is equally rich in important nutrients like vitamins, minerals, antioxidants, and other phytochemicals.
And although its flavor is different, it is the ideal ingredient for a delicious and highly nutritious meal.
You will also find that it is a quite versatile vegetable, since it can be served au gratin with cheese as well as in a good vegetable broth; it can be ground up into burgers or dipped in buffalo sauce as an alternative to spicy chicken wings.
And the best thing is that it is made up of 85% water, it lacks fat and provides a large amount of nutrients, among which we can mention: fiber, iron, calcium, potassium, phosphorus, folic acid, magnesium and B vitamins, C, E and K.
There is a wide variety of recipes and ways to serve it. We assure you that once you have included it in your diet and notice its benefits, you will not change it for anything.
Whether in your country house or in your urban garden, after this guide planting cauliflowers will be much easier.
Did you know:The cauliflower head is actually an undeveloped flower and if it were not protected by thick leaves for most of its life, sunlight would stimulate chlorophyll production and it would become inedible.
Cauliflower Characteristics
Cauliflower is a variety of the Brassica oleracea species, from the Botrytis group, and is related to other cruciferous vegetables such as broccoli, cabbage, and Brussels sprouts.
It is native to the coast of southern and western Europe and its cultivation is quite tolerant of soils with high salt and gypsum content.
 Although under adverse conditions it has very little tolerance for competition with other plants and species, since they take away the nutrients necessary for its development.
It is an annual plant, this means that you can plant cauliflowers throughout the year. However, it is advisable to prevent flowering from coinciding with the hottest season, but also with the coldest.
In the Northern Hemisphere, it is at its best between the months of September and January.
It is similar to broccoli, with the difference that its head or «pella» is white and is also the only edible part. It is surrounded by green leaves that protect it from sunlight.
It can reach 30cm in diameter and weigh more than 2kg.
In addition to white cauliflower, there are other types of cauliflower, such as green and purple cauliflower, less common but with more antioxidants. There are cauliflowers with spherical, rounded, conical and flattened heads.
Romanesca green cauliflower, for example, is a hybrid of broccoli and cauliflower and its head grows in the form of fractals.
Depending on their growing cycle, cauliflower varieties can be divided into:
cauliflower varieties
- Short cycle varieties and harvest in summer-autumn: they take between 45 to 90 days to complete their cycle. Among these are the Fremont and Bola de Nieve varieties.
- Medium cycle varieties and autumn-winter harvest: they take between three to four months to complete their cycle. Its pellet is usually more compact than in short-cycle varieties. Some varieties are the French Primus, the Dutch Durato and the Canberra, from Australia. We also find the Large Christmas Cauliflower.
- Finally, we find the long-cycle varieties, harvested between mid-winter and early spring. These take between 4 and 6 months to harvest and are very resistant to cold. To mention a few, we find the Late Lenten Cauliflower, the San José cauliflower, the Metropolitan cauliflower and the Ebro.
Being cool-season plants, they thrive best in climates where the average temperature is 15°C. And although its cultivation is relatively simple, it requires meticulous maintenance to obtain a good product.
Necessary conditions for growing cauliflower
To plant cauliflower we must pay attention to the following requirements:
Irrigation
It requires humidity and constant watering. The land must be watered, avoiding puddles and taking great care not to touch the leaves so as not to generate mold.
Some recommendations on irrigation
When they are growing, the ideal is to water them between one and two times a day.
You have to try not to wet the pellets. To favor irrigation, a drip irrigation system can be installed.
If you plant in a place with frequent rains, you may only need to water them a few times a week.
Make sure the soil is well drained. Flooding and puddles can cause root suffocation and disrupt cauliflower development.
A good idea to make it easier for the water to drain properly is to mulch with mulch or comfrey leaves.
Did you know:You can add a potato or an apple during cooking, to reduce the intensity of its strong aroma.
nutrients
 Cauliflower is quite demanding in terms of the nutrients it requires for its development.
If it does not receive the necessary amount, its growth will be inconsistent, which will cause the product to have a bad taste and texture.
In addition to requiring a large amount of nutrients, it is also necessary that the soil has a neutral pH, between 6.5 to 7.0.
Nutrient Recommendations
It is recommended that you make sure to measure the pH of the soil and add the different nutrients necessary to adjust its acidity.
Otherwise, your plants can get the disease known as cauliflower hernia.
Potassium, phosphorus and nitrogen are vital nutrients for the development of cauliflower. If you consider that the soil is poor in any of the three, it will be necessary to add fertilizers to enrich it.
Sunlight is also essential. It is recommended to plant cauliflower in a place where it is exposed to the sun for at least 6 hours.
Substratum
Finally, the effective cultivation of cauliflower requires soft and well-fertilized soils, fresh and with regular humidity.
It is important to consider that cauliflower adapts better to neutral soils and does not support limestone soils.
To keep the soil well nourished, a good composition of peat and earthworm humus is recommended, which will contribute to maximizing nutrients and improving use.
Substrate Tips
 Make sure your land has a high content of organic matter. This improves the soil’s ability to retain moisture.
Also, make sure you have the grow in a spacious spot. It is recommended that the plants are at a distance of between 45 and 90 cm approximately.
Mulching should be maintained throughout the growing process, as it helps regulate temperature and humidity.
Before planting cauliflowers
The seeds
Cauliflower seeds are round, grayish in color. They have an approximate diameter of 1mm.
Cauliflower has a reputation for being a bit brittle. Therefore, it is recommended to place it in the garden as seedlings instead of sowing the seeds.
Temperature
The ideal temperature should be 16 ºC.
It should be ensured that its flowering does not coincide with very hot times, nor with environments below -7 ºC.
Generally speaking, in warm climates, cauliflower should be sown in the spring, and in cooler climates, it should be sown in the fall.
pH
Check the pH of the soil. The range should be between 6.5 and 7.0 to prevent cauliflower hernia.
The fertilizer
 It requires fertilizers high in nitrogen, phosphorus and potassium. A good amount of boron is also recommended.
If cauliflower doesn’t have enough boron, it will begin to turn brown and its stems will begin to shrivel.
To counteract the absence of boron, spraying the leaves with a solution of boric acid is recommended.
The solution can be prepared using 2 grams of boric acid for every 5 liters of water.
This procedure should be done only when it is really necessary, since an excess of boron in the soil can be harmful.
You can also make use of a seaweed extract every two weeks until the symptoms subside.
For future crops, you can add boron to the soil by mixing it with compost or planting cover crops of carob or clover.
To keep the soil well nourished, a good composition of peat and earthworm humus is recommended.
Organic fertilizers such as alfalfa, cottonseed meal, and manure are quite effective at enriching the soil.
Did you know:Salvador Dalí was so obsessed with cauliflowers that, on one occasion, he filled a Rolls Royce with 500 kgs. of cauliflowers and led him to the Sorbonne.
Where do we grow cauliflower?
Preferably outdoors. With direct sun for at least 6 hours.
It needs rich soils. The best ones are those that allow moisture to be stored, since they normally need a lot of water.
If you plan to plant in warm exteriors, try to keep the soil always fresh. If the weather is rather cold, you can put a plastic cover to keep the soil at a good temperature.
It is recommended to sow the seeds in seedbeds or pots, and transplant them when they have three to five leaves.
The seeds can also be sown directly in the garden or orchard.
How do we prepare the land?
The soil must have good filtering. To achieve this, sawdust or small stones can be added to the substrate for good drainage.
A good idea to make it easier for the water to drain properly is to mulch with mulch or comfrey leaves.
Loosen the bed and apply a layer of compost of about 1cm. Compost will help conserve moisture and regulate temperature.
We started planting cauliflowers
On what dates?
The time in which cauliflower is harvested is very varied and can occur between 40 to 180 days after planting, depending on the crop and variety.
Tips for northern and cold areas
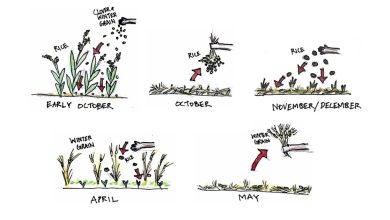
- Summer-autumn varieties: sow between January and March in a protected seedbed.
- Autumn-winter varieties: sow in a seedbed outdoors, between May and June.
- Winter-spring varieties: sow in open-air seedbeds, between July and September.
In addition, you should consider the climate of your region:
 In warm regions, it is best to sow in seedbeds in early fall, transplant to the garden in early winter, and harvest in early spring.
Although in regions that are too warm, it is recommended to transplant them to the garden a little earlier, so that they can mature during the rest of the fall and all winter and harvest them before the arrival of spring.
In cold regions, it is sown in the nursery at the end of winter and transplanted at the end of spring. This way, cauliflower can be harvested in late summer or early fall.
The planting process
Seeds can be sown to a depth of 1cm, usually taking five to ten days to germinate.
The distance between planting rows must be between 45 and 90 cm, depending on the crop.
Summer crops can be grown between 45 and 70 cm, while those winter crops require a greater separation, between 60 and 90 cm.
Did you know:It is so versatile that with it you can make dough for pizzas, rice, lasagna, gnocchi, couscous and even hamburgers.
How do we water?
Irrigation must be constant, but it is necessary to ensure that the water drains easily and that puddles do not occur.
Important:We do not want the way of watering to generate floods or puddles on the ground under any circumstances.
When they are growing, it is recommended once or twice a day. When watering, do it in furrows and not on the plant.

In general terms, try to give them between 3 and 4cm of water per week.
You can form a shallow depression around the seedbed to help keep the soil from holding water. This gives firmness to the soil and keeps the seedbed moist.
Try to keep the soil moist, but not too moist as this can cause the cauliflower root to rot.
Also, you may need to keep the soil moist at 70°F (21°C), you can supply heat under the seedbed to keep the temperature under controlled conditions.
the transplant
The transplant from the seedbed to the garden is done when the cauliflowers have between 3 and 5 leaves.
If you have directly sown in the garden it is important to clear excess plants that can hinder the growth of cauliflowers. Invasive plants rob cauliflower of necessary nutrients and resources.
They should be grown in an open, sunny site, with soil that retains moisture well but is well drained.
To transplant a seedling, remove the plant from the pot very carefully, making sure not to break the roots.
When planting, bury the roots and stem to the base of the first leaves, taking care not to get any soil on the central shoot.
It is advisable to underpin the plants, adding soil to the base of the stem to prevent them from falling over.
Bleached and aired
The soil must be kept moist, but avoid flooding, as they can cause root suffocation and stop development. A good idea to avoid this is to mulch with mulch or comfrey leaves.
As the cauliflower grows, the cauliflowers need to be protected from the sun so they don’t turn yellow.
For this, it is recommended to use the leaves of the same plant, in this way the cauliflower will be whiter and more tender when harvested.
To achieve this process called «blanching», when the pellet reaches the size of an egg, you must bend the leaves of the plant to cover it.
Utiliza una cuerda o una banda elástica para mantenerlas bien sujetas.
Asegúrate de que la pella está seca cuando lo hagas, de otro modo estarías atrapando la humedad en el interior e incrementando así el riesgo de que se pudra.
Tampoco ates las hojas demasiado fuerte para no impedir el paso del aire.
Debes revisar las pellas después de regar la planta, para evitar que se acumule la humedad. Esto te permitirá, además, verificar su crecimiento para saber cuando cosecharlas.
Aquellos cultivos que tienen hojas que crecen de forma natural hacia arriba se protegen por si solos, sin necesidad de que tengamos que intervenir. Así mismo, las variedades de color, como la coliflor morada y la naranja no necesitan blanquearse.
¿Cómo realizamos la cosecha de la coliflor?
El tiempo en que se cosecha la coliflor es muy variada y puede ocurrir entre los 3 y los 6 meses después de ser plantada.
Se cosechan cuando están duras, con la pella grande, blanca y firme. La pella debe medir alrededor de 15 cms.
Cuando los brotes de cabeza comienzan a separarse o se ponen amarillentos, significa que el punto de cosecha ya pasó, perdiendo calidad y sabor.
Para cosecharla se debe cortar el tallo, manteniendo adheridas a la pella las hojas que la protegen, pues dañan fácilmente. Estas hojas también pueden ser consumidas.
Una vez recolectadas, pueden guardarse en el frigorífico durante una semana. También se puede congelar para almacenarla a largo plazo.
De igual modo, una vez cortada, la puedes colgar boca abajo en una lugar fresco y ventilado durante unas tres semanas.
Asociaciones favorables de la coliflor
 Se asocia bien con la patata y la cebolla.
Las lechugas, las espinacas y el apio pueden crecer en el mismo jardín y son también buenos compañeros para la coliflor.
Si plantas menta o romero cerca de tus brotes de coliflor, esto ayudará a ahuyentar algunos parásitos.
Malas asociaciones
No se llevan bien con las coles de bruselas, los brócoli o los rábanos, pues compiten por los nutrientes.
En cuanto a la rotación, es importante considerar que son plantas exigentes y que requieren de rotaciones de tres a cinco años sobre una misma parcela.
Common pests and diseases
pests
Bed bugs and caterpillars are common pests on cauliflower crops. However, the most dangerous are considered:
- Cabbage butterfly: It is white with black dots. It lays yellow eggs on the underside of the leaves. When they hatch, their larvae eat the leaves, leaving the central nerve.
- Cabbage fly: it is similar to the house fly. It burrows into the neck of the cauliflower stem and hollows it out, causing the leaves to shrivel and die.
Some organic recommendations to avoid pests can be:
- Plant mint and rosemary nearby.
- Citronella oil repels whiteflies. _
- Bacillus thuringiensis powder can control caterpillar and cabbage butterfly attacks.
- To prevent cabbage fly infestation, it is advisable to eliminate all competing weeds, as they are a good refuge for them. In addition, you have to alternate the cultivation of cruciferous.
- Inspecting your cauliflower plants daily and removing parasites will often be enough to keep your vegetables free of pests.
- At the very least, do a pest inspection once a week.
Diseases
cabbage hernia
It is a diseas


![Photo of Prune Capers: [Importance, Time, Considerations and Steps]](https://www.complete-gardening.com/wp-content/uploads/2021/06/Alcaparra_1615296745-390x220.jpg)